How Create Profile

Friday, February 29, 2008

Follow these steps to create a new e-mail profile in Outlook

1.

Click Start, and then click Control Panel.

2.

Click Switch to Classic View, and then double-click Mail.

3.

In the Mail Setup dialog box, click Show Profiles.

4.

On the General tab, click Prompt for a profile to be used, and then click Add.

5.

In the Profile Name box, type a descriptive name for the new e-mail profile, and then click OK.

6.

In the E-mail Accounts dialog box, click Add a new e-mail account, and then click Next.

7.

Click the appropriate server type for your new e-mail account, and then click Next.

8.

Type your account information in the required boxes, and then click Next.

9.

Click Finish, and then click OK.

Note By default, both the Outlook Address Book and the personal folders (.pst) files are automatically added to each new e-mail profile, except for those e-mail profiles that are created in Microsoft Exchange Server. By default, .pst files are not added to each new e-mail profile in Exchange Server.

How to configure Outlook to start with a specific e-mail profile

Follow these steps to configure Outlook to start with a specific e-mail profile:

1.

Click Start, and then click Control Panel.

2.

Click Switch to Classic View, and then double-click Mail.

3.

In the Mail Setup dialog box, click Show Profiles.

4.

On the General tab, click Always use this profile under When starting Microsoft Office Outlook, use this profile.

5.

In the Always use this profile list, click the profile that you want to use, and then click OK.

How to configure Outlook to prompt you for a specific e-mail profile

Follow these steps to configure Outlook to prompt you for a specific e-mail profile:

1.

Click Start, and then click Control Panel.

2.

Click Switch to Classic View, and then double-click Mail.

3.

In the Mail Setup dialog box, click Show Profiles.

4.

On the General tab, click Prompt for a profile to be used under When starting Microsoft Office Outlook, use this profile.

5.

Click OK.

Read more...

Outlook Signature

Thursday, February 28, 2008

How to Add Outlook Signature

The instructions below are based on Microsoft Outlook 2003. Other versions of Outlook (e.g. Outlook Express) may be slightly different.

1. Load Microsoft Outlook.

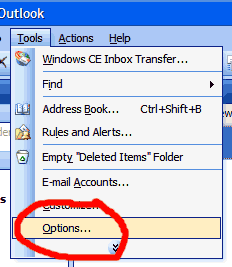
2. From the Tools menu, select the 'Options' option

3. Select the 'Mail Format' tag, and click ‘Signatures’.

4. Click ‘New’.

5. Select the 'Use this file as a template:' option, and click on 'Browse'

6. Locate the template on your computer using the drop down menu at the top of the box. The template will be a HTML file. Click on 'Select'

7. You may enter a name for your signature if you wish. Click on 'Next'.

8. Next click on the ‘Finish’ button

9. In the Preview window you will see your signature. Click on 'OK'.

10. Select the template you have added by using the drop down menu

11. Click on 'OK' to complete the process.

12. Microsoft Outlook 2003 is now setup to send and receive email using the Signature template that you have setup.

Read more...

How to Configure Outlook

Tuesday, February 26, 2008

Generic Instructions:
Note: An example account name was used through the instructions. Please substitute your POP3 email address information for the account used in the instructions

The example address is: name@domain.com
Account name is: name@domain.com
Domain is: domain.com

Configuration Steps:

1. Start your email program.

2. Find the Options/Accounts menu where you can input a new account. Look for key words such as your incoming/POP3 Server or outgoing/SMTP Server.

3. Go through the steps to add a new account to your email program, so that whenever you check mail using this email program it will check your POP3 email account.

4. When you are asked to enter specific information regarding your new account, use the following as a reference:

Your Name: Enter your name as you'd like it to appear in the From field on your emails
User name/Account Name/Subdomain/Alias: Enter the whole email address (yourname@yourdomain.com)
Email address: Enter your POP3 email address
Incoming/POP3 Server name: POP3.ChangeIP.co
Outgoing/SMTP Server name: SMTP.ChangeIP.com
Password: Enter your POP3 account password.

5. If you are unsure about what to enter in a specific field within your email program, please email Support@ChangeIP.com. Please include your email program name, your domain name, and the areas that you are unsure about so that we can help you solve the problem.

Follow the steps detailed below to use Microsoft Office Outlook to send/receive Email.

1. Start Microsoft Office Outlook On the Tools menu, Select EMAIL ACCOUNTS

2. Select ADD NEW E-MAIL A/c and click NEXT

3. Choose POP3 and click NEXT.

4. Enter NAME of COMPANY OR PERSON and Add E-mail Address name@domainname.com] .
5.Mention INCOMING MAIL SERVER as (mail.domainname.com / domainname.com) and OUTGOINGMAIL SERVER as (mail.domainname.com / smtp.domainname.com).

6. Specify USER NAME as Complete email account for E.g.: name@domainname.com, Enter PASSWORD: ****** and Select On REMEMBER PASSWORD [If you wish to avoid entering password every time] – Recommended

7. Go to MORE SETTINGS choose Outgoing Server, select My Outgoing Server Requires Authentication.

8. Further Select the 2nd point, "LOG On Using" and specific user name as (email@domainname.com) and Enter password and check Remember Password for your convenience and Click "OK".

9. Your Email account is successfully incorporated - to check this click on Test Settings. You should not get any error in this test and a test mail will be received in your Inbox in some tim
10.Once All tests are completed successfully. Click Close to continue and then Next.
11.Click Finish to save the settings you have made.

12. Click send/receive mails to get a test mail from Microsoft Office Outlook Test Center.

13. You have successfully incorporated your email account with Microsoft office Outlook

Read more...

How to Send mail

Monday, February 25, 2008

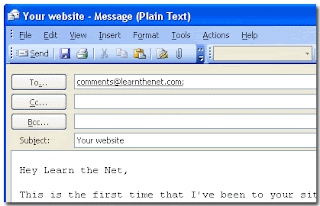
1. E-mail is by far the most popular service on the Internet. Sending messages is a snap. Just follow these simple steps. (Although our demonstration uses Microsoft Outlook, most e-mail programs work the same way.)

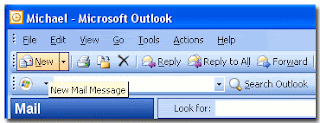
Open your e-mail program and launch a new message window by clicking on the appropriate icon.

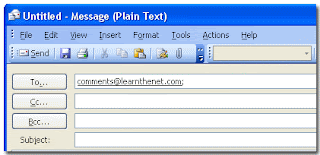
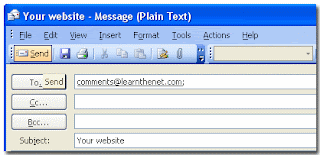
2. In the TO box, type the name of the recipient. It should take this form: comments@learnthenet.com. Make sure you enter the address correctly or the message will return to you.

You can send a message to more than one person by entering multiple addresses. Just put a semicolon (;) between each address.

You can also send a copies (Cc:)and blind copies (Bcc:) to multiple addresses.

Your return address is automatically sent to the recipient.

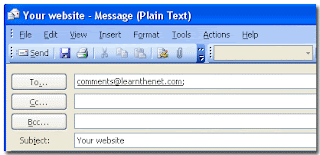
3. Type the subject of the e-mail.

4. Write your message in the message window. You can also copy text from a word processing program and paste it into the window.

5. Click on the Send icon or select Send from the File menu.

Read more...

Exiting Outlook

Friday, February 22, 2008

Discussion

You can exit Outlook in the same way you would exit any other Windows-based program. You can use the Close button on the application window title bar to close the program quickly.

If you are using Outlook as a mail client, you have two options when exiting Outlook. You can close the program using the Exit command and remain logged on to the server, or you can exit and log off the server using the Exit and Log Off command. Both commands are located on the File menu.

Procedures

1. Select the File menu
2. Select either the Exit command or the Exit and Log Off command.

Read more...

Using the Folder List

Discussion

The Folder List can be used instead of (or in conjunction with) the Outlook Bar. This list allows you to view available folders and to display items within those folders. You can also perform folder management functions, such as creating subfolders to organize your items.

The Folder List does not appear by default. You can display the Folder List by clicking the name of the open folder, which appears on the left side of the Folder Banner. A small down arrow appears next to the open folder name. When you select a folder from the Folder List, the folder appears in the information viewer and the Folder List is disabled. You can also use the folder name as a toggle to disable the Folder List.

You can permanently enable the Folder List using the Folder List command on the View menu or the pushpin symbol at the top of the Folder List. Conversely, you can disable the Folder List using the Folder List command on the View menu or the Close button at the top of the Folder List.

Procedures

1. Select the View menu.
2. Select the Folder List command
3. Click the plus sign (+) to the left of the desired folder to display its contents, if necessary.
4. Select the desired subfolder to display its contents.
5. Click the Close button on the Folder List title bar to hide the Folder List.
6. To temporarily display the Folder List, click the name of the open folder in the Folder Banner.
7. Select the desired folder in the Folder List to display its contents.

Read more...

Displaying or Hiding a Toolbar

Discussion

Toolbars provide shortcuts to menu commands. By default, the Standard toolbar appears in a folder or item window. Buttons on the Standard toolbar change depending on which features within Outlook you are using. For example, when you are using the Inbox folder, the Standard toolbar includes buttons for sending and receiving messages. When you are using the Calendar, the Standard toolbar displays buttons specific to scheduling.

You can also display the Advanced toolbar when you are working with folders and the Formatting toolbar when you are working in an item window. Depending on your e-mail editor, other toolbars may be available when you are creating a message.

You can hide and display toolbars as needed. You can choose to display one, several, or all the toolbars at any given time, or you can hide all the toolbars. Whenever you point to a toolbar button, its name appears in a ScreenTip. A toolbar button is dimmed if it is not available for the current task; however, a ScreenTip still appears whenever you point to the button.

Procedures

1. Select the View menu
2. Point to the Toolbars command
3. Select the toolbar you want to display or hide.

Using the Outlook Bar

Discussion

The Outlook Bar provides a central location where you can access the features of Outlook, as well as select different folders that contain items such as messages, schedules, task lists, documents, shortcuts, and other folders. The Outlook Bar is fully customizable.

The Outlook Bar may contain two or three groups by default depending on your setup: Outlook Shortcuts, My Shortcuts, and Other Shortcuts. The Outlook Shortcuts group contains the Inbox folder, a central folder for all of your messages; the Calendar, Contacts, Tasks, Journal, Notes, and Deleted Items folders; and the Outlook Today page. The My Shortcuts group contains mail folders. The Other Shortcuts group contains shortcuts to system and file management related tools, including My Computer. If too many icons are present to display them all at once, a scroll arrow appears on the Outlook Bar. You can open a folder or page by clicking its icon on the Outlook Bar.

Procedures

1. To display the contents of a group on the Outlook Bar, click the group name.
2. To display the items within an Outlook Bar folder, click the appropriate icon.

Using the Outlook Today Page

Discussion

The Outlook Today page displays a summary of your appointments, tasks, and e-mail messages. You can view a list of all your appointments, tasks to be completed, and the number of unread, unfinished, and unsent messages on this page. You can check off tasks that have already been completed or display detailed information about a listed appointment or task. In addition to summarizing your day, you can also find a contact using the Outlook Today page.

You can open a folder or item listed on the Outlook Today page by clicking either the associated icon or the hyperlink text. When you point to the hyperlink text, the mouse pointer changes into a pointing hand and the text may appear underlined.

Procedures

1. Click the Outlook Shortcuts group on the Outlook Bar.
2.
Click the Outlook Today icon to open the Outlook Today page
3. Point to the desired folder or item on the Outlook Today page until the mouse pointer changes into a pointing hand
4. Click the desired folder or item

Read more...

Outlook Interface

Using the Outlook Interface

Discussion

Microsoft Outlook, like other Windows-based programs, opens within a window and includes the standard title bar with control buttons. A menu bar appears at the top of the window, which contains short and full menus. When you first select a menu, a short menu containing only a subset of the menu commands appears. You can use the arrows at the bottom of the short menu to display the full menu or wait a few seconds and the full menu will appear. When you choose a command on the full menu, it will appear on the short menu the next time you display it. The Standard toolbar appears under the menu bar and a status bar appears at the bottom of the window.

The Outlook Bar appears on the left side of the Outlook window and contains shortcuts to Outlook programs and folders. You can add and remove shortcuts, make the shortcuts small or large, and hide the Outlook Bar, if desired. The Outlook Bar contains two groups, Outlook Shortcuts and My Shortcuts, (and depending upon your setup, may also contain the Other Shortcuts group) to help organize your information. Clicking a group on the Outlook Bar displays the shortcuts within that group. You can also create your own groups, as well as move shortcuts to different groups within the Outlook Bar.

The information viewer occupies the majority of the Outlook window. It displays items in the selected folder, application, or shortcut. For example, when the Inbox folder is selected, the information viewer displays the items within the Inbox folder. You can change the way information appears in the information viewer by sorting, grouping, and filtering items, as well as by adding or removing columns.

The gray bar that spans the top of the information viewer is called the Folder Banner. The name of the current folder appears on the Folder Banner. When you click the folder name, a drop-down list of folders and shortcuts, called the Folder List, appears. The Folder List appears next to the Outlook Bar and displays folders, files, and shortcuts in a hierarchical tree format similar to Windows Explorer.

Read more...

OUTLOOK

Tuesday, February 19, 2008

Starting Outlook

Discussion

Microsoft Outlook is a comprehensive desktop information management program. You can use Outlook as a central inbox for all of your internal and external e-mail messaging systems. You can also use it to manage your contacts, to organize your calendar and scheduling, and to maintain a journal of your activities. Additionally, Outlook integrates a number of system management features that help you manage your files, folders, and system resources.

When Microsoft Outlook is installed, a shortcut icon is automatically placed on your desktop. You can use this shortcut icon or the Start menu to start Outlook.

Depending on how you are using Outlook, the procedure for starting the program may vary. If you are using Outlook as an e-mail client for a Microsoft Exchange client-server messaging system, you may be required to log on to the Exchange server when Outlook is launched. If you are using Outlook as an e-mail client for your Internet mail and you access the Internet through dial-up networking, you may be prompted to log on to the Internet or your Internet mail server. This prompt may occur when the program is launched, or when you use Outlook to retrieve mail from your Internet mail server. If you are using Outlook in a standalone mode and are not using its messaging features, you will not be required to log on to any e-mail server when the program is launched.

Procedures

1. Select the Start menu.

2. Point to Programs.

3. Select Microsoft Outlook.

4. Type your password, if prompted.

5. Select OK, if necessary.

6. If the Office Assistant balloon appears, select Start Microsoft Outlook to close it.

7. Maximize the Outlook window, if necessary.


Read more...

  © Blogger template Writer's Blog by Ourblogtemplates.com 2008

Back to TOP